If you're familiar with the Raspberry Pi NoIR Camera Module (or the latest NoIR 2), then you know that it is essentially the same as the regular camera module, but without an IR filter (NoIR = No Infrared filter). This lack of the IR filter allows you to see in the dark using infrared lighting, but the daytime photos with this camera are washed out and distorted. Here is an example (from this article on RasPi.TV ) showing the same daytime scene shot with a regular camera and a Pi NoIR Camera!

IR or NO-IR, that is the question!

The Waveshare RPi IR-CUT Camera is different in that it has an embedded removable IR-CUT (or IR Cutoff) filter. This means that the IR filter can be turned on or off as desired electronically, allowing you to take both day- and night-time photography with it.
For daytime shots, this means that your images will not have the color distortion that we saw with the Pi NoIR Camera, while still having the ability to disable the IR filter and take night-vision photography/videography. Additionally, it comes with two attachable IR LED lights, which means that it has its own IR light source (of course, you can always embellish it with outside IR light sources).
The Day/Night Mode on this camera can be toggled in two ways:
- by editing the config.txt file to append "disable_camera_led=1" to it (not supported on Pi4 according to Waveshare)
- by using the extra connector through-hole on the camera that can be attached to a Raspberry Pi GPIO pin. You can toggle the mode by changing the GPIO level of the pin (HIGH --> Day Mode, LOW --> Night-vision Mode)

The IR-CUT Camera is a 5 MP camera as opposed to the 8 MP of the Pi NoIR 2 ( the original Pi NoIR is also a 5MP camera). However, unlike the Pi Camera, it has easily adjustable focus by rotating the camera lens till you get your desired focus. It also comes in two flavors: IR-CUT and IR-CUT (B) that have different lenses.
ProtoStax - a versatile enclosure for the IR-CUT Camera
ProtoStax already supports the Raspberry Pi Camera Module/NoIR (both V1 and V2) with its ProtoStax Camera Kit for Raspberry Pi Camera. It also supports the new Raspberry Pi High Quality Camera with its ProtoStax Camera Kit for Raspberry Pi High Quality Camera . With ProtoStax Enclosures' modularity and extensibility, it only seemed logical to add support to this interesting camera from Waveshare!
With the newly introduced ProtoStax Camera Kit for Waveshare RPi IR-CUT Camera, you can now pair the IR-CUT camera with any Raspberry Pi (A+,B+/4B, Zero/W) by using the appropriate ProtoStax Enclosure for Raspberry Pi (A+ , B+/4B, Zero/ZeroW)
ProtoStax Kits and Add-ons are meant to easily add functionality to your ProtoStax Enclosures by removing and replacing the stock pieces with new pieces from the kit/add-on.
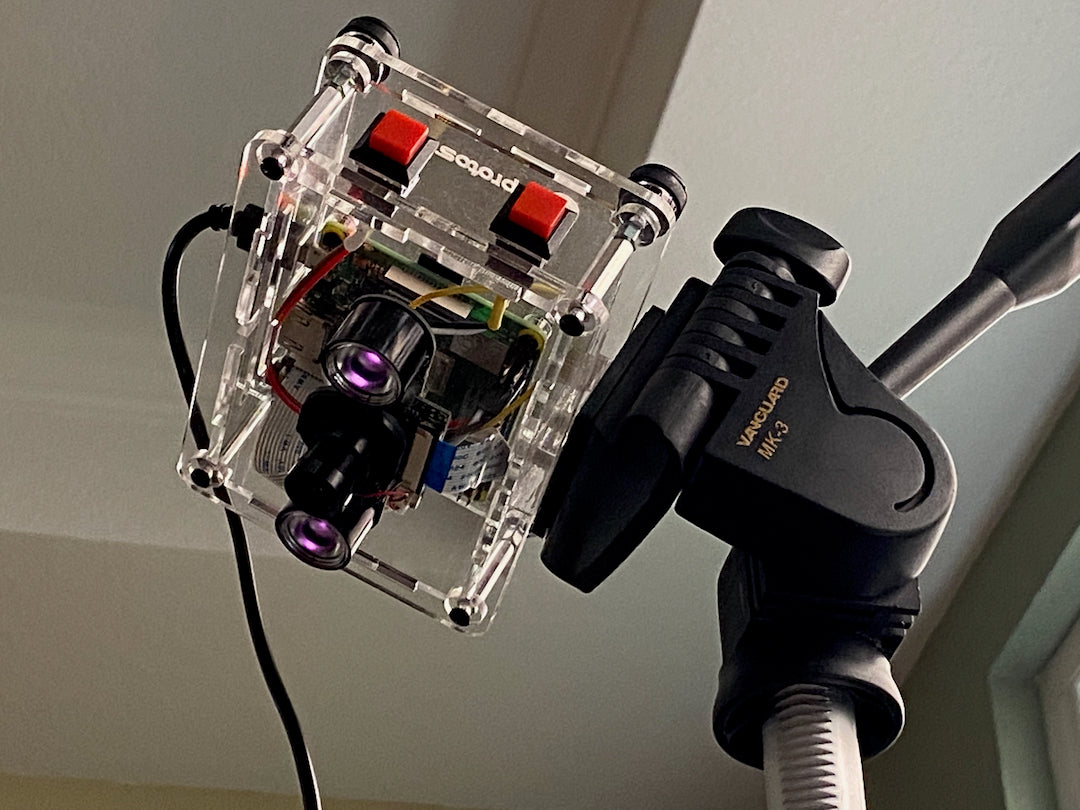
Mount the IR-CUT Camera to the Top Plate from this ProtoStax Camera Kit and then simply swap out the stock plate from your ProtoStax Raspberry Pi Enclosure with this new Top Plate. This kit's Top Plate has mounting holes for the IR-CUT Camera, a slot for the camera cable as well as a hole for the wire from the GPIO pin to the connector on the IR-CUT camera (get ready for some light soldering!). If you're using a Raspberry Pi Zero, you'll also need the appropriate camera cable for the Zero.

The ProtoStax Camera Kit for Waveshare RPi IR-CUT Camera comes in 4 variants – you have the option to also get Side Plates with Tripod Mounts - either a Short-Side Tripod Mount, Long-Side Tripod Mount, or both (see picture above)!
You can swap out one or more Side Plates from your ProtoStax Enclosure for Raspberry Pi to add the tripod mount(s) to your case.
Voila! Your very own tripod-mountable Day/Night-vision Camera! (shown below with both long- and short-side tripod mounts).

Add Programmable Buttons to Your Camera
You can also add momentary push button switches to your camera setup with the ProtoStax Kit for Momentary Push Button Switches (see picture below). You can hook these buttons up to your Pi's GPIO and program in your desired functionality to handle the button presses.
[again, get ready for some light soldering to solder jumper wires to the buttons leads]

We had some fun and ended up making a Tweeting Camera with this setup using Python. One button was used to toggle Day or Night Mode. The other button was used to take either a photo or video and then post it together with a message to Twitter. A short press resulted in a Photo Tweet, and a long press resulted in a Video Tweet. We'll do a project writeup and post it together with instructions and code soon! 😊 Sign up for our newsletter to be notified when we do, or join the ProtoStax community on our Project Hub!
The example below shows the Day and Night modes in action, in a low-light setting. You can see the Day Mode shows truer colors, while the Night Mode picks up a good amount of detail in this low-light setting. The Tweet message includes which mode was selected for debugging/information.

Here is a Video Tweet - our Python program would record about 10 seconds of video and then Tweet it with the specified message following the long-press of the button. The Tweet message here includes that it was a video in Night Mode for debugging/information.

This versatile camera will give you decent night-vision photography/videography and be good enough to use for day shots too! Coupled with our enclosure and extension kits, you can build yourself a camera to figure out who your nightly garden denizens are, or catch your pets in action at night when they think you're asleep, or make yourself a Party Photo Booth Tweeter for your next gathering!
We'd love to know what you come up with! Share your Waveshare RPi IR-CUT Camera projects/setups/photos/videos in the comments below!
Happy Making!
Sridhar & The ProtoStax Team 😊